Understanding ng-options is a lot simpler than one would expect after seeing the angular documentation for it.
When do we have to use it?
We use it when we want to bind a javascript object to a select box (using ng-model).
(NOTE: ng-repeat can ONLY be used to bind a primitive/string to to a select box, it won’t work with a javascript object).
For example, let’s say I want a select box that is able to change the currently selectedCompany. The code would look like the below:
// companies.js$scope.companies=[{name:"ABC Soap Shop",id:1,revenue:5000,type:"brick_and_mortar"},{name:"Pizza Haven",id:2,revenue:100000,type:"brick_and_mortar"},{name:"XYZ Mac Repair",id:3,revenue:45000,type:"brick_and_mortar"},{name:"Facebook",id:4,revenue:8999999,type:"online"},{name:"Apple",id:5,revenue:999999999999,type:"online"}]$scope.selectedCompany=$scope.companies[0];
12345
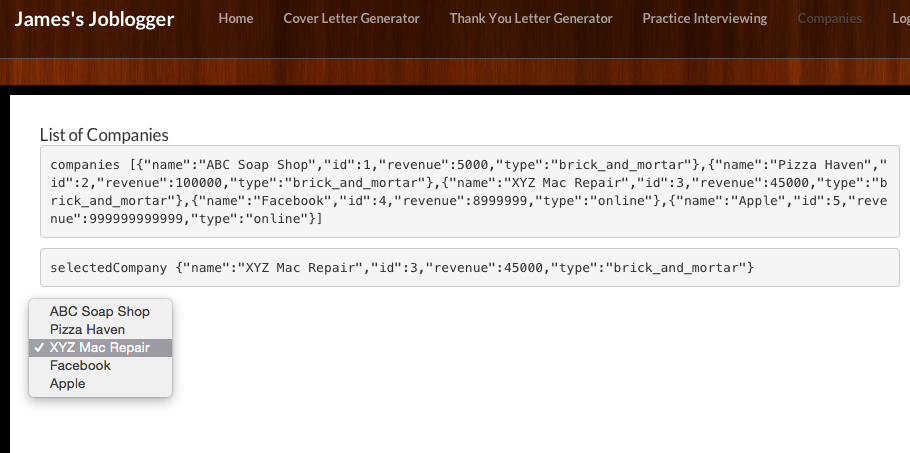
ListofCompanies<pre>companies{{companies}}</pre><pre>selectedCompany{{selectedCompany}}</pre><selectng-model="selectedCompany"ng-options="company.name for company in companies"></select>
Great! That is all the code is needed for this all too common situation. You can see from the screenshot below, it works as expected. When you change the selectbox value, then the whole object selectedCompany changes along with it.
Alright, so what’s the deal with the the “as” keyword for ng-options?
The key to understanding this is that the binded value for selectedCompany by default is whatever is in between the “for” and “in” keyword (in our case company).
We can change that with “as” keyword. Here is an example:
Let’s say that instead of binding selectedCompany to the whole company object, we just wanted to bind it to the id of the object. We can achieve this with the “as” keyword.
123
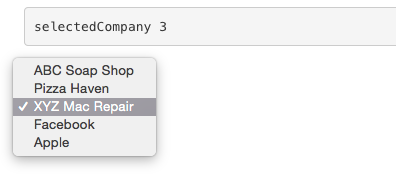
<span>selectedCompany{{selectedCompany}}</span><selectng-model="selectedCompany"ng-options="company.id as company.name for company in companies"></select>
Notice the flexibility with ng-options. We have the company name as the label, but the model bound value is the company id.
Just a recap: The word that is before the “as” keyword is the bound value; it is the value of what you want selectedCompany to be. The word that follows the “as” keyword is the option label. The word that follows the “for” keyword is whatever you want to refer each individual element as. Finally, the word after “in” is the array that you are using for ng-options.
With the “as” syntax, the following 2 selects would be equivalent:
1234
<selectng-model="selectedCompany"ng-options="company.name for company in companies"></select><selectng-model="selectedCompany"ng-options="company as company.name for company in companies"></select>
Conclusion:
ng-options provides a flexible interface for dealing with the html select box and it’s options. It is the angular way and you will definitely come across and have to learn it if you are writing production angular code. Although there are a few more things you can do with ng-options (using it with objects instead of arrays, grouping options, etc.), I am going to end here with an excerpt from the angular docs:
“In many cases, ngRepeat can be used on option elements instead of ngOptions to achieve a similar result. However, ngOptions provides some benefits such as reducing memory and increasing speed by not creating a new scope for each repeated instance, as well as providing more flexibility in how the select’s model is assigned via the select as part of the comprehension expression. ngOptions should be used when the select model needs to be bound to a non-string value. This is because an option element can only be bound to string values at present.”
JSON APIs are all the craze nowadays in web programming. Let’s talk about an easy way to create a JSON API with rails-api. First, let’s install the rails-api gem.
gem install rails-api
Then let’s make a new rails-api app (rails-api is basically just a lightweight version of rails with just the resources necessary and customized for creating an api, i.e. no view layer support). For this blog, I am going to create an api for the backend for one of my past apps (http://joblogger.herokuapp.com/)
rails-api new joblogger-api && cd joblogger-api
Great, this command created what looks to be a smaller version of a normal rails app and changed directory into the app. Now let’s add what we are going to need to the Gemfile:
Add your gem for whichever database you are going to be using (i am going to be using postgres and editing the database.yml, but it is fine and easier for you if you use the default sqlite gem)
The gems of note is the active_model_serializer gem (this let’s me format the JSON output for various resources). My other gems are for testing using Rspec, factories, creating fake seed data (faker), and debugging (pry).
Let’s run the bundle and execute the setup commands for the gems (for me there is only rspec).
bundle install
rails generate rspec:install
Great, now let’s create a resource almost every app needs. Let’s create users.
rails g resource user name:string email:string favorite_color:string
Notice that the rails generator now knows that this is an api (thanks to this being a rails-api project) and refrains from generating routes that arent used in apis (if you look at the routes.rb file, new and edit aren’t included). Also notice that a serializer is generated for the user model thanks to our activerecord serializer gem :
Let’s write some tests and create an index action on the UsersController to get a list of all the users. Let’s say the functionality we want for our app is for the favorite_color to not be shown as part of the index action:
1234567891011121314151617181920212223242526272829
#spec/controllers/user_controller_spec.rbrequire'rails_helper'RSpec.describeUsersController,:type=>:controllerdodescribe"index"dobefore{get:index}it"responds successfully with an HTTP 200 status code"doexpect(response).tobe_successexpect(response).tohave_http_status(200)endit"lists the user's public attributes while hiding the user's favorite_color"doresponse_keys=JSON.parse(response.body)["users"].first.keysexpect(response_keys).toinclude("id")expect(response_keys).toinclude("name")expect(response_keys).toinclude("email")expect(response_keys).to_notinclude("favorite_color")endendend#app/controllers/users_controller.rbclassUsersController<ApplicationControllerdefindexusers=User.allrenderjson:usersendend
Now let’s run rspec . and we expect the second test to fail as the response will probably include favorite_color. (NOTE: you may need to run rake db:setup with the appropriate rails environments and/or rake db:migrate to setup your test and development databases if you haven’t already)
rspec .
Great as expected, one test failed. You’re failure should be somewhere along the lines of:
Failure/Error: expect(response_keys).to_not include("favorite_color")
       expected ["id", "name", "email", "favorite_color"] not to include "favorite_color"
Now, let’s edit our user serializer so that favorite_color isn’t shown as part of the index action (/users)
The attributes are a whitelist of a what is shown. Now let’s rspec . again and we can see all tests pass!
You can also run a rails server and hit your local endpoint /users to confirm that this works. You should get something like this
A short guide breaking down the key components of RESTful architecture
So until last week, I had thought I understood REST. I thought that for an app to be RESTFUL, all an app had to do was have logical URIs*. Although this is a big part of it, there is so much more to it. Roy Fielding, the man who introduced REST, wrote a 168 page dissertation (link) explaining REST. Although that is a good read in itself, the main concepts of REST can be explained in something much shorter and I hope to do that in this blog post.
So let’s talk about why REST is important.
Back when the web was new, web apps didn’t talk to each other much. It was mainly humans who talked to a web app. Times have changed. Web apps need to talk to each other. They talk to each other through APIs. An API is the interface implemented by an application which allows other applications to communicate with it.
For web apps to have a smooth transition in talking to each other, the APIs of web apps need to follow some sort of architectural pattern. REST is just one of these patterns that is extremely popular and it makes app to app communication easy.
Need an example of app to app communication?
Think of how a lot of apps are just mashups that incorporate various APIs like those of Youtube, Google Maps, Twitter or Facebook and then integrate them to do amazing things.
Let’s say you want to create an app where you use Facebook’s api to get “likes” data on different categories, then use that information to find areas that you might like around your area. This app wouldn’t be very difficult to execute because Facebook and Google follow RESTful conventions so it is easy to talk with data. You can just get a json object from a get request and then use specific properties of that json object to then talk to the Google Maps API.
So what are some of the guidelines of REST?
(I am going to assume the usage of the http/https protocol, for simplicity’s sake and the fact that it is by far the most common protocol today)
You have Resources and URIs that make sense
You should have resources and those resources should be properly named and represented with the URI. This is probably best explained with examples. example1http://nbastalk.com is a prolific and dynamic web site where you can view a nba player’s recent social media feed (twitter/facebook), youtube videos, and recent sports statistics. To view a certain player’s (players is a resource) profile, all you would need to go is http://nbastalk.com/carmelo-anthony
That is very logical and makes sense, while http://nbastalk.com/fasfs1/ssdfas3434/155 to view Carmelo’s profile does not. Try them both, you may be in for a fun surprise. example2 If you have nested resources, the same rule applies. If you have states with different political groups and you wanted to see all the political groups for NY, the URL of the listing of the political groups resource should look something like this: http://fake-political-data-api-website.com/ny/political-groups
Uniform Interface (Correct usage of the HTTP verbs get, post, put, delete)
get requests are expected to retrieve information
post requests are expected to create new data
put requests are expected to update data
delete requests are expected to delete data
(fyi head requests are just like get requests except that the server returns an empty body (just returns the header information))
Using these requests, the server is able to deliver and receive information without the client having to know how the information is being constructed. This is encapsulation at its best. Through a uniform interface, the server abstracts away the inner complexities of the application.
Stateless, Hypertext As The Engine Of Application State (HATEOAS)
Every individual request from the client to the server must contain all the information necessary information to understand the request. Everything necessary should be in the response body and head. You cannot rely on a server to store context (think sessions, cookies and pstore as things that shouldn’t be relied on). Each individual response from the server should have links with what you can do with that resource.
Cacheable
Resources should be cachable when possible as this decreases response time from server to client. The protocol should specify which resources can be cached and for how long.
Free format/Does not specify implementation details
Let the user dictate what kind of mime the info is passed in. Don’t force a user to have to parse your xml into json. Worse, imagine if the user is forced to change his app to handle specific data just to use your api. If your api is set up correctly, the client should be able to specify what kind of response they want.
Try submitting a GET request to (or just go to the following urls) the following: http://www.reddit.com/.json http://www.reddit.com/.xml
See below how the Rails framework does this for us:
So next time you build an API, don’t rest until you make sure your API is RESTful. Or you can always go the SOAP (a well engineered, but much more complex architectural pattern) route but be prepared to your hands dirty first as it is a lot more complex.
Recently, I wanted to create a blackjack program that incorporates a real life blackjack card-counting situation. It needed to be realistic so it would need a pause. Additionally, I wanted it to clear the screen every once in a while so that the user won’t be overwhelmed with the heavy text from previous rounds. I realized that some of the bash commands would be an instant remedy to my problems. Then, I wondered what is the best way to incorporate these bash commands in my script. The 3 ways that I know are using
1) Using system
system(‘ls’)
2) Using backticks ls`
3) Using built in syntax %x()
NOTE: that for x you can replace it with any character; it just acts as a delimiter
%x(ls)
There are subtle differences between these 3. The most important difference is regarding there return values. System returns true or false depending on if the command was able to be executed, while the other 2 return the result of the backtick command. This is an extremely important distinction as my ‘clear’ command in my blackjack game would not work with backticks or the built in syntax. This is because clear needs tooutputs ANSI sequences to clear the screen; if I just returned clear (using backticks or the build in syntax), my screen would not get cleared.If I wanted it to be executed correctly, I would need to do a system(‘clear’); the other 2 ways of bashing commands wouldn’t work.
An actual code snippet from my Counting Cards Blackjack Game, utilizing BASHing within a Ruby Script:
def dealer_hits_until_17
  @new_hand = false
  while hand_score(@dealer_hand) < 17 && @new_hand == false
    puts "Dealer Hits! His hand is now #{@dealer_hand}"
    system('clear')
    hit(@dealer_hand)
    `sleep 1`
  end
  if @new_hand == false
    compare_hand_value
  end
end
Pry is one of my favorite gems. It is a REPL (it reads, evaluates, prints, loops). Pry is a replacement for Ruby’s default REPL, irb. Pry’s advantages over irb are Pry adds additional features such as syntax-highlighting, auto indenting, and super useful debugging features. To install pry and its plugins (in this guide, I will also be using pry-byebug), perform the following commands:
$ gem install pry
$ gem install pry-byebug
Once you have those gems installed, you can enter into a session with pry, by just typing pry in your Terminal.
$ pry
My absolute favorite feature of pry is its ability to load any portion of a file you are working on in your text editor directly into your REPL session. Let’s say you are working in sublime text 2, so below is your prime.rb file:
12345678
#prime.rbdefprime?(num)(1..(num/2)).select{|element|num%element==0}.length==1endbinding.prydefevery_prime(num)(1..num).each{|element|puts"#{element} is a prime? #{prime?(element)} "}end
If I wanted to play around with these methods, I normally would have had to copy and paste everything into my REPL session. Right now, this doesn’t seem like a big issue for my file as it is literally less than 10 lines long. However, imagine if I had a file that contains thousands of lines. Try copying and pasting something like that into your terminal (Don’t actually try it, it may take a while).
So how does pry tackle this problem? binding.pry
So how do we use binding.pry?
The way you do this is by requiring the pry gem at the beginning of the file and then use binding.pry wherever you want to REPL to load into.
12345678
#prime.rbdefprime?(num)(1..(num/2)).select{|element|num%element==0}.length==1endbinding.prydefevery_prime(num)(1..num).each{|element|puts"#{element} is a prime? #{prime?(element)} "}end
(notice how we put “binding.pry” after our first method “prime?(num)”; this causes the repl to only load the first method. If we wanted to play around with the “every_prime(num)” method, then we would have to put change the location of “binding.pry to the end of the file.).
All we need to do now is type “ruby primes.rb” in our terminal.
$ ruby primes.rb
Ok, so we’ve went through pry a little. Now, let’s go through pry-byebug(use pry-debugger for ruby versions before 2.0). We use pry-byebug in much the same way as using pry. Pry-byebug is really useful if you want to step through loops. Pry lets you see what certain variables are equal to at different points of your code.
To realize the full utility of pry-byebug, let’s take a look at slightly more complex and messy code.
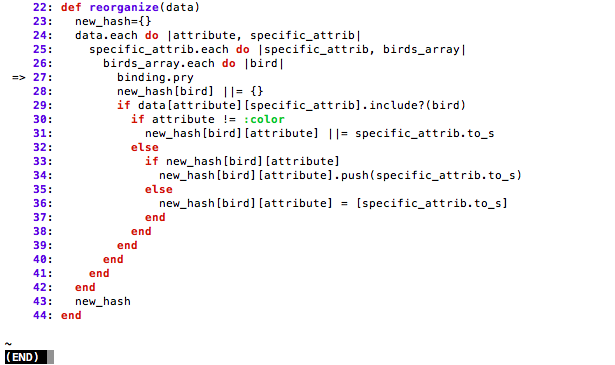
What pry-byebug allows you to do is to step through your code. Notice how I put my binding.pry in the middle of my method. I do this so that when I open my file I go to that specific line of my code. I use pry so that I am able to see what variables equal at that specific point of code. This is extremely useful for debugging. Now open your ruby file again normally:
$ ruby pigeon_organizer.rb
You will end up with something like this:
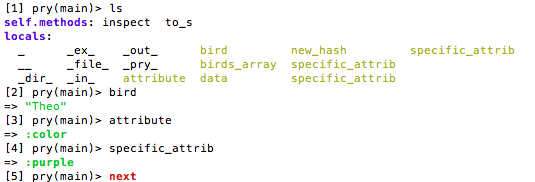
First type ‘q’ to enter back into your pry session.
q
You can see a group of your local variables/methods with the ‘ls’ command. You can even type in the name of the variable to see what it is currently defined as (shown below).
As this is just an intro. to Pry and Pry-byebug and there are so many different things to learn about them, I will let you explore these two gems on your own. In this pry session, some other commands that you may want to try on your own are ‘help’, ‘cd’, ‘quit’, ‘step’, ‘next’.
Today, I am going to be talking a little bit about the different resources that I used to learn programming/web development.
Web Learning:
Udacity-This site has a lot of courses. The course that I took here was Intro. to Computer Science. I feel that this course is a great first step into programming. The quality of instructor, TA, and course material are top-notch. Please note that this course is taught in Python. As of writing this review, Udacity is still free. I definitely have no complaints about this site. 10/10
Codecademy- This is a great site to start at if you have never coded before. It is currently free. I also noticed that it has quite a few bugs. I really enjoyed the content, especially the Ruby course. For a free site, it is good. 8/10
Codeschool- I prefer this site over Team Treehouse. Some of the material on this site CAN be difficult at first. The transition between courses in the same path can be challenging. For example, even after finishing Try Ruby, you may find it tough to finish Ruby Bits (parts 1 and 2). It is best to go through a real book (see below) first after Try Ruby. I wouldn’t recommend starting out at this site for beginners as a lot of the courses assume that you have basic programming knowledge.However, this is the site to work on once you have the fundamentals down. The content in the videos are very condensed. The quality of the instructors is top-notch. 9/10
Team Treehouse-This site is Okay. The instruction on this site is definitely a lot more in-depth than Codeschool, making it the more beginner-friendly choice. There are whole sections dedicated Also, I feel that some of the materials on this site are a bit outdated. I was super confused in their MySQL tutorial where they asked me to install a certain SQL GUI that was no longer on the MySQL site. 6/10
Rubeque: This site is good for solving problems with the knowledge that you are gaining from other places. Definitely aim to complete a few problems a week on this site.
9/10
Books:
Peter Cooper’s Beginning Ruby-This is an excellent book for beginners. It goes through everything in-depth and I like that it has example programs that walk you through building real programs.
9/10
Chris Pine’s Learn to Program-Another great book that is available for free on the web. It is very well-written and helpful for learning the basics.
10/10
Michael Hartl’s Rails Tutorial Book-Rails is complex and I believe that this is the best introduction to Rails. This is a “must-go-through” if you are starting Rails. 10/10
Besides these websites/books, there is a myriad of resources out there. In conjunction with resources, you should also work projects. Simple ones such as creating a tic tac toe game, blackjack game, chat box, or even a bot are great examples of projects that you can work on.
If I were to do it all over again and start learning Ruby/Rails from scratch, I would go through my resources in the following order:
Chris Pine’s Learn to Program and some of Codecademy or Team Treehouse
a) (Optional) Udacity’s Intro to Computer Science
Peter Cooper’s Beginning Ruby
a) Create a simple programming project
Today, I am going to start blogging about my journey in learning web development and computer programming. This journey started a few months ago as I decided I wanted a career in which I was constantly learning and constantly building.
To achieve my goal, I started doing web tutorials at codecacademy, rubymonk, codeschool, teamtreehouse. Along the way, I also read a few books including Peter Cooper’s Beginning Ruby, eloquentjavascript, Chris Pine’s learn to program. (I will review each of these sources in-depth in a future post).
After some time self-studying, I read an article about programming bootcamps and how they were revolutionizing learning. Excited about the prospect of an intense “bootcamp-like” learning experience, I did a lot of research on the different schools and started applying to many. I ended up choosing the Flatiron School. In this blog, I will post about some of the cool things that I learn along the way.
If anyone has any questions regarding my posts or my experiences, feel free to email me at jtong33@gmail.com